Keeping your wrought iron door in great condition is easier than you think. Regular maintenance every 2–3 years can prevent rust, chipped paint, and weather damage from turning into costly repairs. Here’s a quick summary of the five steps to refresh your door:
- Inspect the Door: Look for rust, scratches, or paint damage, especially in moisture-prone areas like hinges and corners.
- Remove Rust and Old Paint: Use sandpaper, a wire brush, or a scraper to clean affected areas. Fill deep scratches or dents with metal filler.
- Apply Rust-Preventing Primer: Choose a metal primer with rust inhibitors for long-term protection. Apply thin, even coats.
- Paint the Door: Use high-quality exterior metal paint suited for wrought iron. Apply thin layers and blend to match the existing finish.
- Protect and Maintain: Add a clear topcoat for extra durability and clean the door regularly to keep it looking its best.
Routine care, such as monthly cleaning and hinge lubrication, can extend your door’s lifespan significantly. If the damage is extensive, consider consulting professionals like Forever Iron Doors Carolina for expert restoration.
Step 1: Check and Prepare the Door
Inspect for Damage
Carefully examine the door, paying close attention to areas that are more likely to be exposed to moisture, such as hinges, corners, and any decorative details. Look for signs of rust or discoloration, especially orange-red, flaky spots that indicate corrosion. Make a note of any damage you find before moving on to the preparation stage.
Step 2: Remove Rust and Old Paint
Once you’ve pinpointed the problem areas, it’s time to get rid of rust and old paint. This step is crucial because any leftover rust or peeling paint will undermine your touch-up efforts. A clean, smooth surface is the key to ensuring the primer and paint adhere properly in the next steps.
Sand and Scrape Away Damage
Start with a gentle approach and increase intensity only if necessary. For light rust or small patches of flaking paint, use 120–150 grit sandpaper wrapped around a sanding block. This gives you better control and helps avoid damaging the metal underneath.
For tougher spots, grab a wire brush and scrub in circular motions, applying firm but controlled pressure. If you’re dealing with thick paint layers or heavy rust, a paint scraper can speed things up. Hold it at a 45-degree angle and use steady, consistent strokes.
Work from the outer edges of the damaged area toward the center to prevent rust particles from spreading to clean surfaces. Keeping a shop vacuum nearby is a smart move – it’ll help you quickly clear away debris and avoid grinding rust particles into areas you’ve already cleaned.
Fill Deep Scratches or Dents
After removing rust and paint, you might find deeper scratches, dents, or even small holes that need attention. For these, metal fillers like Bondo or similar automotive body fillers are a great solution. Follow the manufacturer’s instructions to mix the filler, then apply it with a putty knife, slightly overfilling to account for shrinkage.
Let the filler cure completely, which typically takes about 20–30 minutes at room temperature, depending on the product. Once it’s hardened, sand the area with 120-grit sandpaper until it’s flush with the surrounding surface. Run your hand over it to ensure it feels smooth.
If the damage is deeper than ¼ inch, apply the filler in thin layers. This helps prevent cracking and ensures better adhesion, leaving you with a solid, even surface ready for priming.
Clean the Prepared Area
Before moving on to priming, make sure the area is spotless. Start by wiping it down with a clean, lint-free cloth to remove loose dust and debris. Then, use a solvent like mineral spirits or denatured alcohol on a fresh cloth to eliminate oils and any remaining fine particles.
For crevices or decorative details, a paintbrush works well to get into tight spots. After cleaning with the solvent, let the area dry for 15–20 minutes. To check your work, run a white cloth over the surface – if it picks up dust, repeat the cleaning process. A completely clean surface is essential for the primer to adhere properly.
Step 3: Apply Rust-Preventing Primer
Once your surface is cleaned and prepped, the next step is applying a rust-preventing primer. This step is absolutely essential – it not only protects against future rust but also helps the paint adhere properly. Skipping it could leave your door exposed to damage over time. A good primer sets the stage for a long-lasting, smooth finish.
Choosing the Right Primer
Select a rust-inhibiting metal primer specifically made for iron and steel. Many of these primers include zinc, which sacrifices itself by oxidizing instead of the metal, offering strong, long-term protection. For most wrought iron door touch-ups, BEHR 1 gal. White Interior/Exterior Metal Primer is a reliable option at $54.98. It pairs well with most topcoats. If you can’t entirely remove all rust, consider using a rust converter first to stabilize any lingering spots before priming.
Pro tip: If your topcoat is tinted, using a primer in a similar shade can enhance color vibrancy and may reduce the number of topcoat layers you’ll need.
Applying the Primer
Focus your efforts on the areas you’ve prepared – there’s no need to prime the entire door unless you’re refinishing it completely. Use a synthetic bristle brush for intricate details and a foam roller for flat sections. Apply thin, even coats to ensure full coverage of all exposed metal.
Pay close attention to joints, corners, and decorative scrollwork, as these spots tend to trap moisture. Instead of one thick coat, apply two thin coats to avoid drips or sags. Keep a wet edge while working to prevent lap marks, and use long, smooth strokes for the best results.
Allow Primer to Dry
Drying times depend on the type of primer and the weather. Water-based primers usually take 4–6 hours to dry, while oil-based ones may need up to 24 hours. Always check the manufacturer’s instructions for exact drying times.
Pick a warm, dry day with low humidity (below 80%) and temperatures above 50°F. Avoid rain for at least 24–48 hours after application. Keep in mind, primer alone isn’t weatherproof – it needs a compatible topcoat to fully protect the surface. Proper drying now ensures a strong base for the next step: painting.
sbb-itb-cd90297
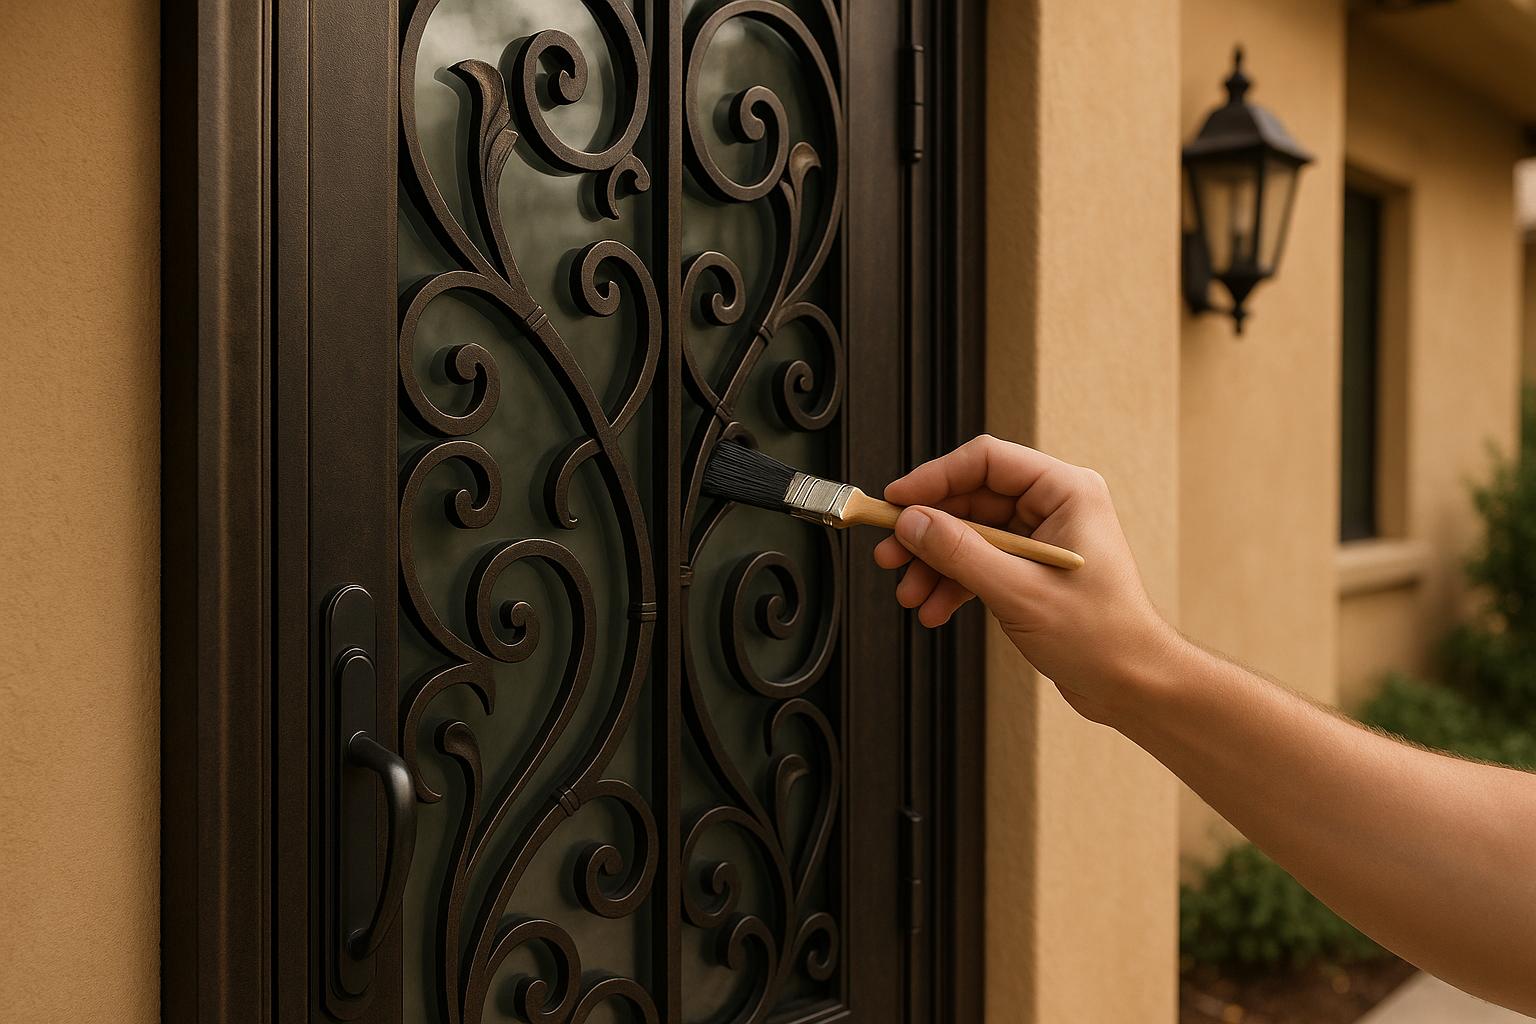
Step 4: Paint the Door
Once the primer has fully cured, it’s time to apply paint. Choose a high-quality exterior metal paint designed specifically for wrought iron. For durability, go with an oil-based option, but if you’re looking for quicker drying times, a water-based paint might be the better choice. Take your time with this step – rushing can leave you with visible brush marks, uneven coverage, or mismatched colors.
Pick the Right Paint
With the primer set, focus on selecting the best paint for the job. Look for something that provides strong weather resistance, durability, and the finish you want – satin or semi-gloss are popular choices for wrought iron doors. Oil-based paints are known for their long-lasting adhesion and toughness, but they take longer to dry and need special cleaning methods. Water-based acrylic paints dry faster and can be cleaned up with water, making them more convenient. Whichever you choose, always follow the paint manufacturer’s instructions for preparation and application.
Apply Thin, Even Coats
Start by pouring the paint into a tray instead of working directly from the can. Use a synthetic bristle brush for intricate details and a foam roller for flat sections. Apply a light first coat, keeping it thin to avoid drips or sagging, and continue adding thin layers until you achieve full coverage. Thick coats can lead to an uneven texture that’s hard to fix. Work from the top down, following the natural lines of the metalwork to avoid lap marks.
Let each coat dry thoroughly before applying the next. Be sure to check the drying times on the paint label, as factors like humidity and temperature can affect how quickly the paint sets.
Match the Existing Finish
To ensure the new paint blends seamlessly with the existing finish, use a blending technique. While the paint is still slightly wet, gently feather the edges into the surrounding area with a dry brush, easing up on pressure as you move outward. If your door has a textured finish, try using a stippling method with a dry brush or sponge on an inconspicuous area first to match the texture accurately. These small touches not only improve the look of the door but also help protect it for years to come.
Step back often to check your work from different angles and under natural light. This will help you spot any inconsistencies in color or texture before the paint fully dries.
Step 5: Protect and Care for the Door
Taking steps to protect and maintain your newly painted wrought iron door is key to keeping it looking great and lasting for years.
Add a Clear Topcoat if Needed
A clear topcoat acts as a shield, protecting the door from wear, moisture, UV rays, and even microbial growth. Choose a product specifically made for metal, with features like UV inhibitors and moisture resistance. Apply several thin layers to a clean, rust-free surface for the best results.
When deciding on a topcoat, think about how much sunlight and moisture your door is exposed to. South- or west-facing doors endure stronger sunlight, while coastal areas bring challenges like salt air and high humidity.
Before applying the topcoat, make sure the surface is completely clean and dry. Use thin, even coats instead of one thick layer – this prevents drips and ensures better adhesion. This method also helps cover intricate decorative details evenly and neatly.
Regular Care Tips
Keeping your door in top shape requires regular maintenance. Clean it monthly using mild soap and water (or biweekly if pollen is heavy or after storms). Lubricate the hinges 2–4 times a year, or monthly if you live near the coast. Check for chips, scratches, or rust frequently, and address any issues as soon as they appear to avoid further damage.
Contact Forever Iron Doors Carolina

Sometimes, regular upkeep isn’t enough, and professional help is needed. If your door has significant damage or wear, reach out to Forever Iron Doors Carolina. Their team specializes in major repairs, custom color matching, and applying professional-grade protective coatings to restore and preserve your door’s beauty and durability.
For doors with historical or intricate decorative details, professional restoration ensures every feature is carefully preserved while bringing the door back to its original charm. With their expertise in custom wrought iron design, Forever Iron Doors Carolina can seamlessly repair or match existing work, maintaining both the structural integrity and aesthetic appeal of your door.
Conclusion
By following these five key steps – checking and preparing, removing rust and old paint, applying a rust-preventing primer, painting with quality materials, and protecting through regular care – you can keep your wrought iron door looking great and functioning well for years to come. Each step plays a crucial role in preserving the door’s strength and longevity.
Regular maintenance is the secret to avoiding costly repairs. Simple tasks like monthly cleanings, quarterly hinge lubrication, and quickly addressing chips or scratches can stop minor problems from escalating into major issues. A well-cared-for wrought iron door can last for decades, while neglecting it might lead to expensive refinishing or even replacement in just a few years.
Taking the time to clean properly, remove rust, and apply primer ensures the paint finish lasts longer. Skipping these steps or rushing through them often results in premature paint failure, which can be both frustrating and expensive to fix.
For larger restoration projects or intricate designs, consider reaching out to Forever Iron Doors Carolina. With their expertise in both residential and commercial installations, they can handle the unique challenges your door may face and provide tailored solutions to keep it in top condition.
FAQs
What tools and materials do I need to touch up a wrought iron door?
To refresh a wrought iron door, gather a few key tools and materials. Start with a wire brush, sandpaper, or a paint scraper to clear away rust or flaking paint. For detailed work, a paint pen or spray primer can make the job easier.
When it comes to materials, opt for black touch-up paint or rust-proof enamel to keep the finish long-lasting. If the door has dents or imperfections, a filler like Bondo works well to smooth things out before you start painting.
How often should I maintain my wrought iron door to keep it in good condition?
To keep your wrought iron door looking its best and functioning well, make it a habit to maintain it every 3 to 6 months. Use a soft cloth to gently wipe away dirt, dust, and grime. While you’re at it, give the door a close inspection to spot any signs of rust or damage.
For added protection, consider applying a rust-resistant finish or sealant every 2 to 5 years. This extra step helps ward off corrosion and keeps your door strong and visually striking. With regular upkeep, you’ll not only extend the door’s lifespan but also preserve its timeless style and security.
What should I do if my wrought iron door has significant damage that I can’t repair myself?
If your wrought iron door has suffered severe damage that’s too challenging to fix on your own, contacting a professional wrought iron repair specialist is the smartest move. These experts can assess the damage and handle tasks like welding, removing rust, or restoring structural components to help your door regain its original charm and strength.
Hiring a professional ensures the repairs are done safely and efficiently using the right tools and methods. For more serious issues, this option not only saves you time but also helps maintain your door’s functionality and aesthetic appeal.