Custom iron doors are a stylish and secure way to upgrade your home’s entryway. They’re built to fit any space, offer superior durability, and can be tailored to match your design preferences. Here’s a quick breakdown of what you need to know:
- Benefits: Enhanced security, energy efficiency, noise reduction, and long-lasting durability.
- Preparation: Accurate measurements, proper tools, and a clean, level entryway are essential.
- Installation Steps: Align and secure the frame, hang the heavy door with care, and fine-tune hardware and seals.
- Maintenance: Regular cleaning, lubrication, and rust prevention keep your door in great shape.
Whether you’re looking to improve curb appeal or boost home security, custom iron doors offer a durable and elegant solution. Read on for a detailed installation guide and care tips.
Preparation and Planning for Installation
Installing a custom iron door is no small task, and success hinges on careful preparation. Taking the time to measure accurately, gather the right tools, and inspect everything beforehand can save you plenty of trouble later. Since custom iron doors are difficult to modify once built, precision is key during this stage.
Measuring and Assessing Your Entryway
Start with the Rough Opening
Begin by removing any interior or exterior trim to expose the rough opening. This allows you to measure from stud to stud for the width and from the floor to the header for the height. These measurements ensure accuracy. Generally, the rough opening should be about 1.5 inches wider and 1 inch taller than the door frame.
Take Multiple Measurements
Measure the width and height at three points – top, middle, and bottom for width; both sides and the center for height. Use the smallest measurement to ensure the door will fit even in the narrowest part of the frame.
Check for Square
To confirm the frame is square, measure diagonally from corner to corner. If the measurements match, the frame is square. If not, adjustments will be needed during installation.
Special Considerations for Arched Doors
For arched iron doors, take additional measurements. Record the width, the total height, and the spring line height (the point where the arch begins to curve).
Once you’ve got precise measurements, make sure you have all the necessary tools and materials before moving forward.
Tools and Materials Checklist
Essential Tools
You’ll need a measuring tape, level, drill, and screwdrivers. Don’t forget safety gear like goggles, work gloves, and steel-toe boots – iron doors are heavy and require extra caution.
Required Materials
In addition to the iron door itself, gather a sturdy door frame, heavy-duty hinges and screws, weather stripping, and high-quality locks and handles. You’ll also need wood shims for adjustments, lag bolts to secure the frame, flat washers, exterior-grade caulk for sealing, and hole plugs for a polished finish.
Optional but Helpful Items
Depending on the installation, you might find spray foam or batt insulation, lag hole caps, and touch-up paint useful for a more refined result.
With everything in hand, inspect the door and prep the installation area to avoid surprises later.
Inspecting and Preparing the Door
Unpacking and Initial Inspection
As soon as the door arrives, unpack it carefully and inspect the door and jamb for any damage. Clark Hall Doors, in their December 2024 installation guide, emphasized the importance of this step, noting that the rough opening should be 1 inch wider and 1.5 inches taller than the jamb for proper installation.
Prepare the Installation Area
Remove the old door and frame entirely. Clean out any debris and smooth the surface, ensuring the floor is level and the opening is plumb and square. Check for dents, scratches, or bends that could affect the installation. Use shims or make adjustments to fix any misalignments before proceeding.
“Proper preparation ensures your project goes off without a hitch.”
- Clark Hall Doors, December 2024
Taking the time to prepare now ensures a smooth installation process and avoids costly mistakes later.
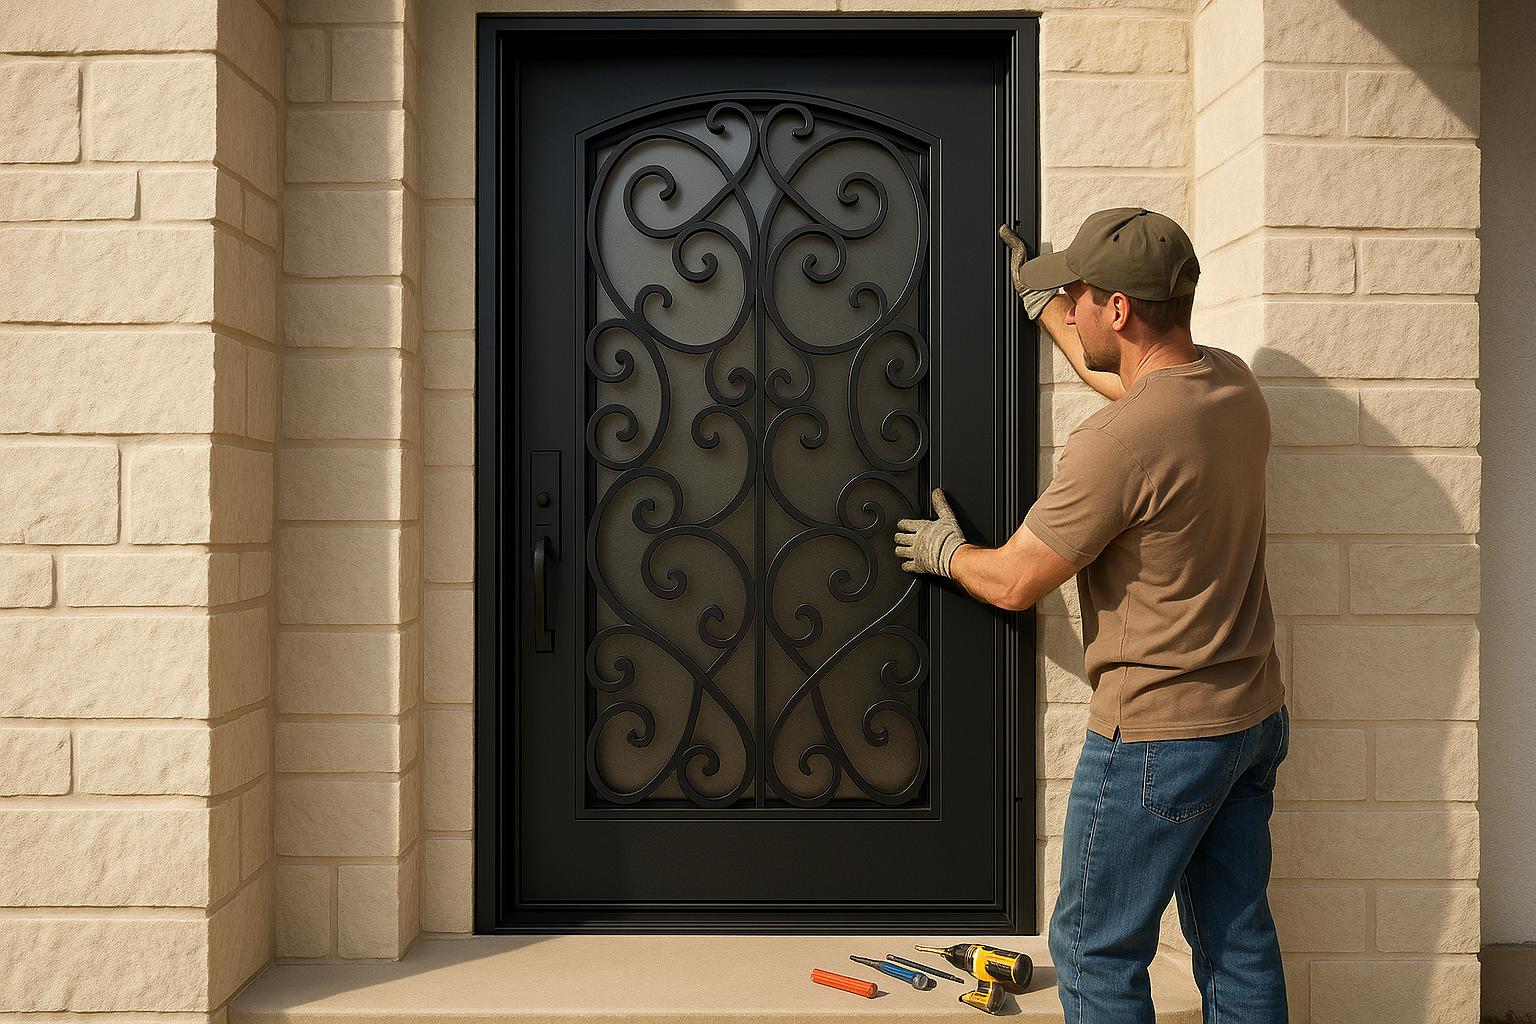
Step-by-Step Installation Process
Once the area is prepped and measurements are confirmed, it’s time to install the door frame. This task demands precision and patience due to the door’s weight and intricate setup. If possible, enlist a team familiar with door installation and general contracting techniques.
Installing the Door Frame
Position the Door Jamb
Start by measuring the rough opening and the dimensions of the door jamb. Adjust the opening with wood bucking to allow for a clearance of 3/8″–1/2″ on each side and 1/2″ on the top. Lay the jamb flat on the subfloor, ensuring the threshold is flush.
Dry Fit and Level Check
Place the jamb into the opening to check spacing and use shims to level the threshold. Leave an extra 1/2″ to 5/8″ for drywall installation.
Secure with Silicone and Fasteners
Apply silicone caulk along the threshold to seal and hold the shims in place. Temporarily secure the jamb using one or two 5/16″ lag screws. For wood studs, predrill holes, or use concrete tap cons for block walls.
Final Alignment and Securing
Double-check that the jamb is level both front-to-back and side-to-side. Make any final alignment tweaks with shims, then secure the frame firmly using heavy-duty anchors or screws.
Hanging the Door
Prepare for the Lift
With the door being heavy, you’ll need at least two people to assist. Oil the hinge cups and secure the ball bearings. If the door has operable glass panels, remove them by unscrewing the window knobs to lighten the load.
Lift and Align
Carefully lift the door and guide it onto its hinges. This step requires a coordinated effort to prevent injuries or damage to the door or frame.
Check Levels and Adjust
Once the door is hung, immediately check that it is level both horizontally and vertically. If the door doesn’t close properly or gaps appear, use shims to adjust and fill those spaces. You might need to make small tweaks to ensure the door fits perfectly and operates smoothly.
Hinge Selection Considerations
For heavy doors, choose hinges built to handle the weight, such as ball bearing hinges, continuous (piano) hinges, or heavy-duty concealed hinges.
Adding Hardware and Glass
Handle Existing Components
Most custom iron doors come with pre-installed features like glass, hinges, thresholds, window knobs, roller catches, and mounting tabs. Use tools like a box cutter, knife, or razor blade with care to avoid scratching the finish. Minor marks can be touched up with paint.
Install Additional Hardware
If you’re adding handles or other accessories not included, you may need to drill into the door. Use drill bits designed for metal and be cautious to maintain the door’s structural integrity. Strike plates might need slight adjustments using a hand file or rotary tool for a precise fit.
Reinstall Glass Components
If you removed glass panels earlier to ease installation, now’s the time to put them back. Ensure the door is completely dry before reinstalling and tighten all screws securely to avoid moisture problems.
Final Hardware Testing
Apply a silicone-based lubricant to all moving parts and test the locks, handles, and glass components to ensure they work smoothly. Once everything is functioning as it should, you can proceed to final adjustments and routine maintenance.
Common Installation Challenges and Solutions
Even with meticulous preparation, installing custom iron doors can come with unexpected hurdles. Knowing what to expect and how to address common problems can make the process smoother and ensure a polished result.
Uneven Floors or Walls
Uneven floors and walls are frequent obstacles during iron door installation. These irregularities can cause the door to sit unevenly, leading to operational issues and gaps that compromise security and energy efficiency.
Spotting the Issue
Use a reliable level to check if the floor and walls are perfectly horizontal (level) and vertical (plumb). If the door looks crooked or doesn’t close properly, chances are the foundation is uneven.
Fixing Uneven Floors
For uneven floors, shimming the lower side is the go-to solution. This levels the base before the door is installed. If the height difference is minimal, sanding the bottom of the door might help it clear the floor smoothly.
Addressing Wall Irregularities
If the door isn’t sitting flush at the top, double-check that the installation surface is level and the hinges are aligned vertically. Adjusting the bottom wall plates or strategically shimming the frame can correct most alignment issues, ensuring the door operates as intended.
Sealing Any Gaps
To close gaps caused by uneven surfaces, apply weather stripping. This helps prevent energy loss and keeps the door secure.
Once these surface issues are under control, the focus shifts to managing the door’s considerable weight.
Managing the Weight of Iron Doors
Iron doors are heavy – really heavy. A single 3′ x 8′ door can weigh around 400 pounds, while double doors might tip the scales at 800 to 1,000 pounds. This weight demands careful planning and the right tools for safe installation.
Assembling a Team
Installing an iron door is not a solo job. You’ll need at least two people to lift and position it safely. Ideally, work with a team experienced in general contracting or door installation for the best results.
Using Safety Gear
Don’t skip the safety gear. Essential items include safety goggles, work gloves, and steel-toe boots. These protect against injuries during the heavy lifting process.
Checking Structural Support
Before installation, examine the door frame and surrounding structure to make sure they can handle the door’s weight. Weak or damaged frames may need reinforcement. Use heavy-duty anchors or screws designed specifically for wrought iron doors.
Planning the Lift
Clear the path, ensure the area is well-lit, and establish clear communication with your team. A well-coordinated lifting strategy minimizes the risk of injuries or damage.
Fixing Alignment Issues
Even after installation, alignment problems can crop up. These might include gaps, squeaky hinges, or drafts. Misalignment often results from settling foundations, changes in humidity, loose hinges, or wear and tear over time.
Identifying Misalignment
Look for signs like uneven gaps, latching problems, or scratches where the door rubs against the frame. These indicate that adjustments are needed.
Adjusting Hinges
Start by tightening all hinge screws. For a firmer hold, switch to longer screws that grip deeper into the frame. If the hinges are worn or damaged, replacing them is a smart move.
Tweaking the Strike Plate
If the door isn’t latching properly, the strike plate might need adjustment. Repositioning or filing it slightly can help align it with the latch.
Shimming for Balance
Doors affected by settling or heavy use may need shims inserted at key points. This can lift the door and restore balance, especially if it’s dragging on the floor.
Regular Maintenance
Lubricate hinges with a silicone-based lubricant to reduce friction and prevent future alignment issues. Routine lubrication also extends the life of the door’s moving parts.
For Serious Misalignment
If the door is severely out of alignment, you may need to remove and rehang it. Before reinstalling, ensure the frame and hinges are repaired to address any structural issues.
Preventing Future Problems
To avoid alignment issues down the line, install door sweeps to seal minor gaps and apply weather stripping to maintain a snug fit. Seasonal humidity changes can affect the door, so regular inspections of the door, hinges, and frame can catch wear and tear before it leads to bigger problems.
sbb-itb-cd90297
Final Adjustments and Maintenance
With the installation and alignment complete, it’s time to wrap up your project with these final steps to ensure everything is in perfect working order.
Inspecting and Testing
Start by checking the door frame with a carpenter’s level and measuring diagonally to confirm that everything is properly squared. Open and close the door to test the swing – smooth, unobstructed movement is what you’re aiming for. Make sure there’s a clearance of about 1/8 to 1/4 inch between the door edge and the jamb. This gap ensures the door operates easily while staying secure.
Next, examine all hinges, locksets, and closers to ensure they’re tightly fastened and capable of supporting the door’s weight. Verify that the door hangs evenly, closes properly, and locks securely.
Check the weatherstripping around the door to confirm it seals evenly along the entire perimeter. Also, inspect the flashing above the door and ensure the exterior caulking around the frame is intact – these features help keep moisture out and improve energy efficiency.
Take a close look at the paint or coating to ensure every surface is fully covered. Any missed spots could invite moisture and lead to rust. If you notice alignment issues or other problems, it’s better to call your installation team rather than attempting major fixes on your own.
For minor gaps, apply a high-quality caulk around the door jamb. Use a backer rod to fill larger gaps before sealing and insulating foam sealant for smaller spaces.
Routine Maintenance Tips
Once the door is operating perfectly, establish a routine to keep it in top condition. Clean the surface regularly using mild soap and water with a soft cloth to prevent dirt buildup, which can trap moisture and cause rust. Avoid abrasive cleaners or harsh chemicals that could damage the finish.
Lubricate hinges and other moving parts every three months with a silicone-based lubricant to keep them functioning smoothly. Twice a year, apply a protective wax to maintain the door’s shine and add an extra layer of protection.
Inspect the door periodically for scratches, dents, or rust, especially in areas prone to moisture. Address any damage quickly – touch up paint chips to prevent rust from forming. For small rust spots, use fine steel wool or sandpaper to remove them, then apply a rust-resistant coating.
If you live in a coastal area, increase the frequency of maintenance to combat salt exposure, which can speed up corrosion. After rainy days or periods of high humidity, dry the door thoroughly. Installing an awning or canopy can offer extra protection from sun, rain, and snow.
Applying a protective sealant every 6 to 12 months can help create a barrier against moisture and weather. This simple step can save you a lot of trouble down the road by preventing rust and other damage.
Improving Appearance with Finishes
The right finish can elevate your iron door from functional to stunning while providing essential protection against rust and corrosion. Finishes not only protect but also add depth, texture, and personality to your door.
When choosing a finish, think about your home’s architectural style, the neighborhood, and the surrounding landscape. Select a design that complements these elements, whether you’re going for a modern, sleek look or a more rustic, traditional vibe.
Powder coating is an affordable option but may peel faster over time, while epoxy paint lasts longer and is easier to touch up. For DIY touch-ups, start with a rust-controlling metal primer, then apply two coats of exterior-grade enamel paint with rust-inhibiting ingredients.
For added character, consider decorative features like hand-forged textures for a timeless, artisanal look or glass inserts that allow natural light to brighten your entryway. You can also customize the color – classic matte black works well for a modern aesthetic, while weathered finishes create a more traditional feel.
Professional finishing processes offer the best protection. Hot zinc galvanizing, for example, bonds at the molecular level with the iron, providing excellent resistance to corrosion. A thorough three-step process – sandblasting, galvanizing, and applying a premium zinc primer – ensures long-lasting durability and a flawless finish.
Proper surface preparation is key to a lasting finish. Sandblasting removes rust, old paint, and other contaminants, creating the perfect base for your chosen coating.
Forever Iron Doors Carolina offers a variety of finishing options and can guide you in selecting the best one for your needs and style. Their expertise ensures your door not only looks fantastic but also stays protected for years to come.
Conclusion
Adding a custom iron door to your home is a fantastic way to boost both security and curb appeal. However, achieving the best results requires careful planning, precise installation, and regular upkeep – all of which we’ve outlined in detail.
One of the standout features of wrought iron doors is their durability. With the right care, these doors can last over 30 years. Maintaining them is straightforward: clean the surface with mild soap and water, lubricate hinges and locks using a silicone-based lubricant, and address any rust spots as soon as they appear. These simple steps can help you avoid costly repairs and keep your door functioning smoothly. Additionally, applying protective coatings not only enhances the door’s appearance but also shields it from moisture and corrosion. Investing in high-quality finishes can go a long way in extending the life of your door while reducing maintenance efforts.
If maintenance or installation becomes challenging, seeking professional help is a smart move. For example, if you notice alignment issues or other problems, reaching out to experts like Forever Iron Doors Carolina can ensure your door is installed and maintained to the highest standards.
A custom iron door is more than just an entryway – it’s a blend of security, elegance, and durability. By following these tips, you can create a welcoming and stylish entrance that will protect your home and stand the test of time.
FAQs
What steps should I take to prepare for installing a custom iron door?
To get ready for installing a custom iron door, start by measuring the doorway with precision. This step is crucial to guarantee the door fits perfectly. Then, take a close look at the door frame to make sure it’s sturdy enough to handle the weight of the iron door. Before you begin, clear the area of any clutter or debris to keep your workspace safe and tidy.
Make sure you have all the tools and materials you’ll need, such as a level, drill, anchors, and screws, ready to go. Lastly, go through the manufacturer’s installation instructions carefully. Familiarizing yourself with the process and any specific guidelines will make the job go more smoothly and ensure your new door fits securely and accurately.
What’s the best way to keep my custom iron door rust-free and looking great over time?
To keep your custom iron door in great shape and free from rust, regular upkeep is essential. Start by cleaning it every few months with a soft cloth and some mild soap or a gentle alkaline cleaner. Steer clear of harsh chemicals or abrasive tools, as they can harm the door’s finish.
Applying a protective sealant or a rust-inhibiting coating every 6 to 12 months can create a barrier against moisture and corrosion. Make it a habit to inspect the door for any signs of rust or wear. If you spot small rust patches, carefully sand or scrape them off, then touch up the area with matching paint or a rust-preventive finish. Don’t forget to lubricate the hinges and other moving parts occasionally to keep everything working smoothly.
By following these simple maintenance tips, your iron door can stay both functional and stylish for years to come.
How can I fix alignment issues with my custom iron door during or after installation?
If your custom iron door seems misaligned during or after installation, the first step is to check if the door frame is level and plumb. Grab a level to verify this, and if the frame isn’t perfectly aligned, you may need to use shims to address uneven walls or flooring.
For smaller fixes, try adjusting the hinges. You can reposition them slightly or place shims between the hinges and the frame to fine-tune the alignment. If the issue remains, you might need to remove the door jamb, add shims where needed, and then reattach it securely. Sometimes, sanding the door’s edge or tweaking the latch can help get that snug, flawless fit.
Taking the time to align everything properly will not only ensure smooth operation but also maintain the sleek, secure look of your iron door.