Installing iron doors in masonry walls requires precision, the right tools, and proper anchoring techniques to ensure long-term security and functionality. This guide covers the essentials:
- Preparation: Measure the rough opening accurately, gather tools like a hammer drill, masonry bits, and shims, and ensure safety gear is on hand.
- Anchor Selection: Choose between wedge, sleeve, or chemical anchors based on the wall material (brick, concrete, or stone) and door weight.
- Placement: Position anchors at hinge levels and across the strike jamb to distribute weight evenly.
- Installation: Secure the frame, drill steadily to avoid cracks, fill gaps with mortar, and ensure alignment with shims.
- Final Steps: Test door functionality, seal with weatherproof caulk, and clean thoroughly.
For heavy iron doors, professional installation ensures proper anchoring, alignment, and durability, especially in challenging masonry settings.
Preparation and Tools Needed
Getting ready ahead of time can make the difference between a smooth installation and frustrating delays. Before you start anchoring your wrought iron door, take a moment to gather all the necessary tools and materials. This will help you work more efficiently and avoid interruptions.
Tools and Materials List
Here’s what you’ll need:
- Tools: A hammer drill with variable speed control, masonry bits (ranging from 1/4 inch to 5/8 inch), a 4-foot level, tape measure, chalk line, and square. Don’t forget shims and spreaders – wood shims work fine, but composite shims are better for exterior use since they resist moisture.
- Additional Equipment: A reciprocating saw with masonry blades for any adjustments, a wire brush, and a vacuum cleaner to clean out anchor holes. For mixing mortar, grab a mixing bucket and a paddle attachment for your drill.
- Materials: Masonry anchors (such as wedge anchors, sleeve anchors, or chemical anchors), galvanized bolts, hydraulic cement or mortar mix, polyurethane sealant, and weatherstripping.
- Safety Gear: Safety glasses, N95 masks, work gloves, and steel-toed boots.
Having all these on hand ensures you’re ready for every step of the installation process.
Measuring the Rough Opening
Measuring the rough opening accurately is critical – it ensures your door fits perfectly within the masonry structure. The rough opening is the actual structural space where the door jamb will sit, so precise measurements are a must.
Start by removing any trim, casing, or threshold materials that might block your view of the bare masonry edges. Then, measure the width at three points: the top, middle, and bottom of the opening. Use the smallest measurement to determine your door size, as masonry openings can vary slightly due to settling or construction differences.
For height, measure from the finished floor (or subfloor, if flooring isn’t installed yet) to the top of the opening on both sides. Again, use the smaller measurement.
Typically, the rough opening should be 1/2 inch to 3/4 inch larger than the door frame on all sides. This extra space allows for shimming, adjustments, and proper sealing to ensure a snug, weatherproof fit.
Safety Precautions
Installing a heavy wrought iron door in a masonry structure comes with its own set of risks, so safety should always be a top priority.
- Protective Gear: Wear safety glasses to shield your eyes from flying debris and an N95 mask to avoid breathing in harmful dust. Work gloves are essential for grip and protection, and steel-toed boots safeguard your feet from heavy drops.
- Wall Stability: When working with masonry walls, create a limited access zone around the area. This zone should extend the height of the wall plus four feet and should only be entered by those involved in the installation. For walls over eight feet tall, ensure they are braced properly to prevent collapse until permanent supports are installed.
- Handling the Door: Wrought iron doors are heavy, so always use proper lifting techniques and get help – most installations require at least two people. Plan your lifting route in advance and clear any obstacles. If the door starts to fall, step back and let it drop safely – don’t try to stop it.
- Drilling Precautions: Before you drill, check the wall for electrical wiring or plumbing using detection tools. Clearly mark utility locations to avoid damaging them during the installation process.
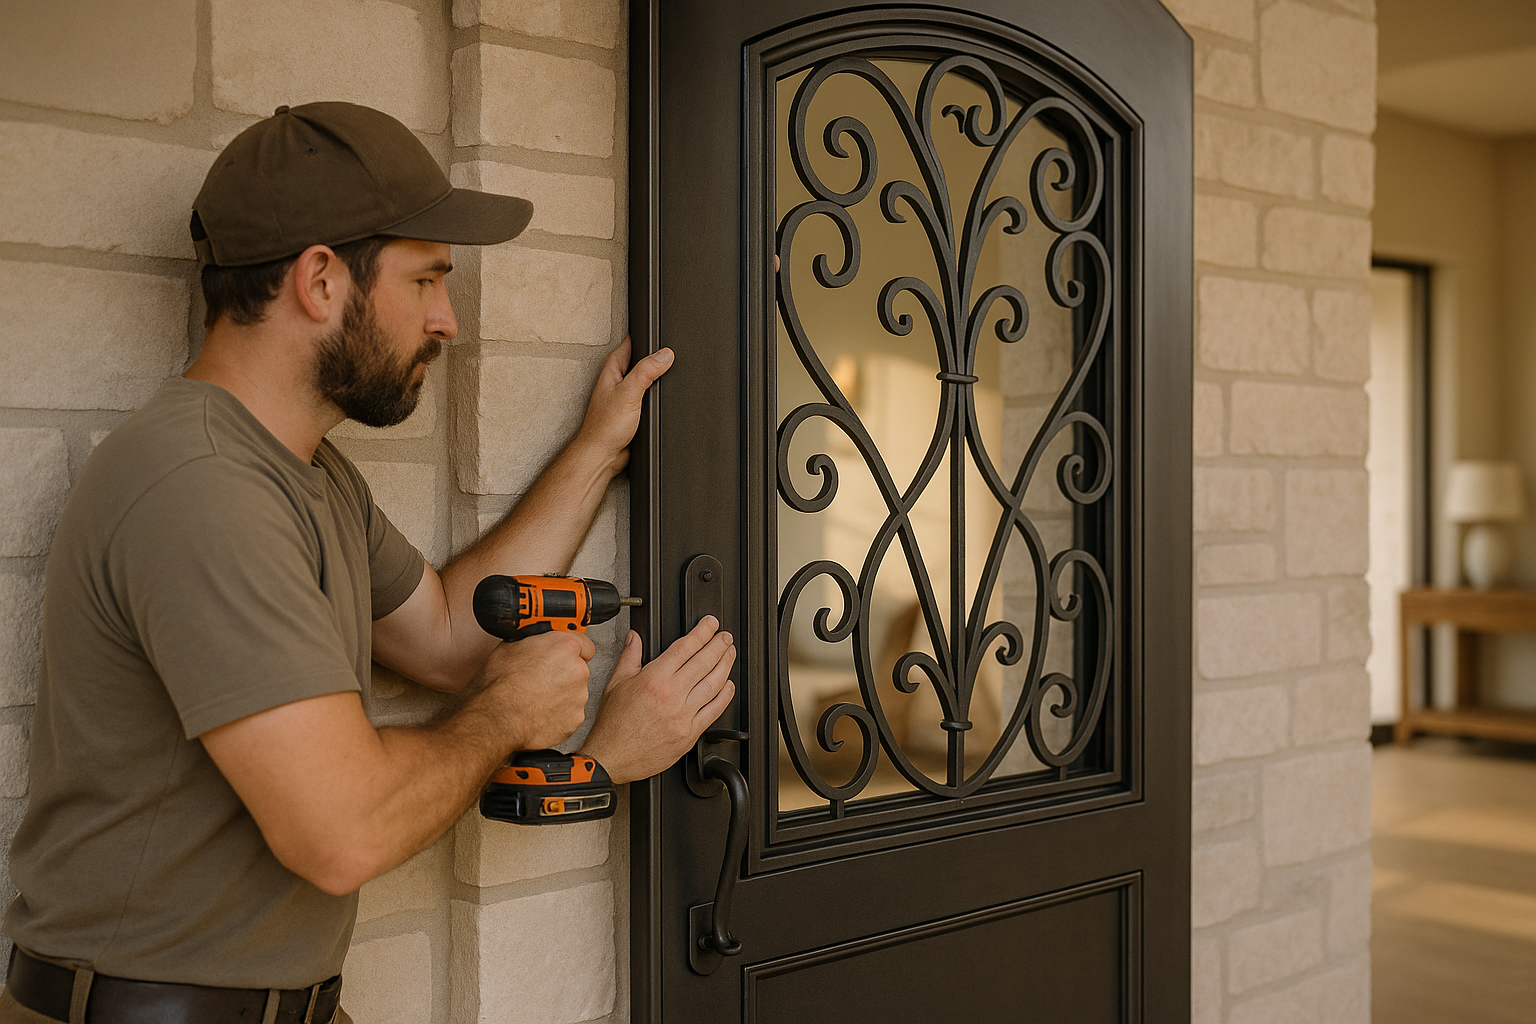
Selecting and Positioning Anchors
Once you’ve prepared the opening and measured everything carefully, the next step is just as crucial: choosing and positioning the right anchors. Getting this part right is key to ensuring the door remains stable. Missteps here can lead to misalignment or gaps, which no one wants.
Types of Masonry Anchors
The type of masonry you’re working with – whether it’s poured concrete, brick, or concrete block – will determine which anchor is best for the job. Here’s a quick breakdown:
- Wedge Anchors: Ideal for solid materials like concrete. These expand when tightened, creating a strong, permanent hold. However, they’re not removable, so use them when permanence is a priority.
- Sleeve Anchors: A more flexible option that works well in both solid and hollow masonry. They expand along their length, distributing the load evenly, and they can be removed if needed.
- Chemical (Adhesive) Anchors: These use a bonding compound to secure threaded rods in drilled holes. They’re a great choice when precise positioning is critical or when the masonry might crack under mechanical force.
Choose anchors that suit your specific project, and always follow the manufacturer’s instructions for installation. Once you’ve selected the right type, precise placement is the next step.
Anchor Placement and Spacing
Anchor placement is a detail you can’t afford to overlook. Start by checking the manufacturer’s guidelines for the recommended number and spacing of anchors for your door frame. If no guidelines are provided, a standard approach is to position anchors at hinge levels and directly across on the strike jamb. This balanced setup helps handle the door’s weight and operational stresses.
When installing hinge jamb anchors, begin with the bottom one as a reference point, then move to the top and middle, checking for plumb and level alignment as you go. Once the hinge jamb is secure, shift to the strike side and repeat the process, ensuring it lines up perfectly with the hinge jamb.
Throughout the process, regularly check the frame to make sure it’s plumb, level, and square. Make adjustments as needed before fully tightening the anchors. Shims can be a big help here, acting as temporary supports to fine-tune the alignment.
For most residential doors, three anchors per jamb are standard. If you’re working with heavier commercial doors, you might need to add more anchors along the jamb to ensure the frame stays stable.
Step-by-Step Installation Process
Now that you’ve got the proper anchor placement sorted, it’s time to install your door frame. This part of the process demands attention to detail to ensure everything is positioned and secured correctly.
Positioning and Securing the Door Frame
Begin by placing the door frame evenly into the rough opening. It should sit flush against the masonry opening with equal spacing on both sides. To keep the frame steady and prevent it from shifting under its own weight, use temporary braces.
Check for plumb and level with a reliable spirit level. Start with the hinge jamb – adjust it using shims as needed. Cedar shims are a great choice because they resist moisture and won’t compress over time. Place the shims behind the anchor points to provide a solid backing for the fasteners.
Once the hinge jamb is plumb, move on to the head jamb and ensure it’s level. Then, check that the strike jamb aligns perfectly with the hinge jamb. To confirm the frame is square, measure the diagonal distances from corner to corner. These measurements should match within 1/8 inch.
To prevent movement during installation, secure temporary bracing across the frame opening. A snugly cut wooden brace placed between the jambs works well to hold everything in place while you continue with the permanent steps.
Installing Anchors and Filling with Mortar
Start drilling anchor holes with a masonry bit that matches the anchor diameter. Drill steadily – applying too much pressure can crack the masonry. Clear out any debris from the holes using compressed air or a vacuum before inserting the anchors.
Install the anchors in sequence, beginning with the bottom hinge-side anchor as your reference point. Insert the anchor through the pre-drilled hole in the frame and into the masonry, tightening it gradually. Avoid over-tightening, as this could strip the threads or damage the masonry.
Continue upward along the hinge jamb, then move to the strike jamb, checking the alignment after tightening each anchor.
When it’s time for mortar filling, mix a small batch of masonry mortar to a thick, workable consistency. Use a pointing trowel to fill gaps around the frame, ensuring the mortar makes full contact with both the frame and the wall.
Smooth the mortar joints with your trowel for a clean, weatherproof seal. Be sure to wipe away any excess mortar from the frame surface immediately – once it dries, it can stain the finish and is tough to remove. With the anchors tightened and mortar applied, you can move on to checking the frame’s overall stability.
Final Alignment and Stability Check
Once the frame is secured and the gaps are filled, allow the mortar to set for at least 24 hours before removing the temporary bracing. During this curing time, avoid putting any stress on the frame that could disturb the setting mortar.
After the mortar has cured, remove all temporary supports and test the frame’s stability by gently pressing on various points. There should be no movement or flexing. If you notice any shifting, it could mean the anchors weren’t secured properly or there are gaps in the mortar that need to be addressed.
Check each anchor point for security by attempting to wiggle them. Properly installed anchors should remain completely firm. If any feel loose, remove the anchor and replace it with a larger one or consider using a chemical anchor system for added strength.
With the frame now solidly in place, it’s ready for the door. Clean the frame thoroughly with a damp cloth to remove any mortar residue or debris before moving on to hanging the door and installing hardware.
sbb-itb-cd90297
Final Checks and Finishing Touches
With your iron door frame securely anchored and the mortar fully cured, it’s time to wrap things up by testing the door and adding those protective finishing touches. These last steps ensure your door works smoothly and stays shielded from the elements.
Testing Door Functionality
Begin by hanging the door and installing all the hardware according to the manufacturer’s instructions. Once everything is in place, systematically test the door’s operation to catch any issues early.
- Check the door swing to ensure it moves smoothly without any sticking or binding.
- Confirm the latch engages properly, the clearances around the door are even (approximately 1/8 inch), and the lock operates without resistance.
Once the door is functioning perfectly, you can move on to cleaning and sealing to complete the installation.
Cleaning and Sealing
After confirming the door operates as it should, finalize the process by cleaning and sealing both the door and the surrounding masonry.
Start by letting the mortar fully cure. Before applying a masonry cleaner, pre-wet the surface to prepare it. Use cleaners specifically designed for masonry from reliable companies that offer detailed instructions and customer support. These cleaners are formulated to provide consistent results. Apply the cleaner with a low-pressure spray (50 psi or less) or a soft-bristled masonry brush made from natural fibers. Avoid abrasive tools like wire brushes, steel wool, or sandblasting, as these can damage the masonry or leave stains on your iron door.
Take precautions to protect nearby areas, such as plants, neighboring structures, and drainage systems, from chemical exposure and runoff. If you’re cleaning during colder weather (below 40°F), be cautious – low temperatures can slow chemical reactions and cause rinse water to freeze in the masonry.
Once cleaning is complete, apply a high-quality, weatherproof caulk around the door frame’s perimeter. Smooth out the caulk bead for a clean, professional appearance.
Finally, clean the door itself with a mild soap solution. Inspect all hardware one more time and ensure the weather stripping sits snugly when the door is closed. With these steps, your installation is ready to stand the test of time.
Professional Installation Services by Forever Iron Doors Carolina

Installing iron doors into masonry walls requires precision and expertise to ensure they remain secure and functional over time. At Forever Iron Doors Carolina, every installation is handled with care and professionalism, ensuring your custom wrought iron door not only looks stunning but also performs flawlessly. This process builds on the meticulous preparation and measurements discussed earlier.
The company’s team includes certified installers and skilled carpenters who are well-versed in the challenges of handling heavy iron doors in masonry settings. Their work begins with detailed measurements that go beyond the basics of width and height. Using advanced techniques, they ensure the frame is perfectly square, a critical step for a proper fit.
"Our experienced team ensures your door, window, or gate is installed with precision and care, for a seamless, secure fit." – Forever Iron Doors Carolina
The installation process also focuses on structural integrity. Before starting, the team carefully assesses the condition of the masonry and framing. If the opening isn’t perfectly square or shows signs of hidden damage, adjustments or repairs are made to prevent future issues that could affect the door’s operation or security.
Because the Carolinas experience seasonal temperature changes and varying humidity levels, the team incorporates regional expertise into each project. They tailor every installation to the local climate, ensuring your door stands up to environmental challenges.
"We want to make sure your home’s framing is structurally sound and your new iron door is level and operating smoothly. We’ll also make sure that the molding and caulk is applied professionally and in proper working order." – Forever Iron Doors Carolina
Forever Iron Doors Carolina goes beyond just fitting the door. Their comprehensive approach includes precise alignment, professional application of molding, and weatherproof caulking. This ensures your new door not only looks great but is also protected against the elements and operates smoothly from the start.
With a combination of certified skills, specialized tools, and knowledge of local construction and climate, their professional installation services are a smart investment. Considering the cost of a custom wrought iron door and the importance of secure anchoring in masonry walls, their expertise ensures your investment is safe and long-lasting.
Conclusion
Every step in the process, from measuring to testing, plays a key role in ensuring a long-lasting installation. Anchoring iron doors into masonry walls requires careful planning and preparation. It all begins with accurate measurements and checking the integrity of the masonry. This groundwork is what lays the foundation for choosing the right anchors and a seamless installation.
When it comes to anchors, picking the right type is essential. Wedge anchors, sleeve anchors, and chemical anchors each work best with specific masonry types and load requirements. The key is to match the anchor type to your wall material and the weight of your iron door. Proper spacing and placement of the anchors are equally important, as they help spread the door’s weight evenly across the wall structure.
The installation process itself demands precision. From positioning the door frame to securing it firmly and ensuring perfect alignment, attention to detail is everything. Testing the door immediately after installation allows for quick adjustments and ensures everything is functioning as it should.
While tackling this project on your own might seem tempting, the complexity of installing heavy iron doors in masonry settings often calls for professional help. Professionals bring the right tools, structural know-how, and experience – especially when accounting for local climate factors. These elements can mean the difference between a door that lasts for decades and one that starts causing issues within just a few years.
Forever Iron Doors Carolina’s certified installers are experts in addressing the unique challenges posed by Carolina’s climate and construction practices. Their experience ensures your custom wrought iron door is installed correctly and operates smoothly from the start. Opting for professional installation is a smart way to safeguard your investment in a high-quality iron door.
When properly anchored into a masonry wall, an iron door offers years of dependable performance. Beyond durability, it adds security and timeless aesthetic appeal, making it a standout feature for any property.
FAQs
What’s the difference between wedge, sleeve, and chemical anchors, and how do I pick the right one for my masonry wall?
Wedge anchors are durable mechanical anchors designed to expand within solid concrete, making them a go-to choice for heavy-duty loads and structural tasks. On the other hand, sleeve anchors, while also mechanical, are more adaptable and can be used in both solid and hollow masonry. However, they generally handle lighter loads compared to wedge anchors. Chemical anchors rely on adhesive to bond with the masonry, providing resistance to corrosion and a neat finish, but they’re typically better suited for non-structural applications or lighter weight demands.
When selecting an anchor, think about the type of masonry and the load it needs to bear. Wedge anchors excel in solid concrete and high-load scenarios, sleeve anchors are ideal for general-purpose or lighter tasks, and chemical anchors are best for specialized, non-structural uses. No matter the choice, proper installation is crucial for ensuring long-term safety and reliability.
How do I keep the door frame perfectly aligned and secure when installing it into a masonry wall?
To ensure your door frame stays aligned and secure during installation, start by placing shims to level and plumb the frame. Once the frame is correctly positioned, fasten it using masonry anchors or bolts. After tightening each anchor, use a level to confirm the frame hasn’t moved out of place. Following these steps carefully will help keep the frame stable and guarantee a precise fit for your wrought iron door.
Why should you consider your local climate when installing iron doors in masonry walls?
Local weather conditions significantly influence how well iron doors hold up when installed in masonry walls. Factors like extreme heat, cold, humidity, and moisture can all take a toll, potentially leading to rust, corrosion, or structural problems over time. Take cold climates, for instance – freeze-thaw cycles can cause trapped moisture to expand, damaging both the iron door and the masonry around it. On the flip side, hot and humid areas can speed up corrosion and make the metal expand, which might affect the door’s fit and overall look.
To keep your iron door sturdy, functional, and looking great for years, it’s essential to consider your local climate during installation. Steps like applying weather-resistant finishes and ensuring a proper seal can go a long way in protecting your door from environmental wear and tear.